Zoom offers a number of ways to protect your meetings from unwanted guests.
You may add a passcode to meetings either when you schedule them or after they are already scheduled. By default, meetings are assigned a random passcode. You can update the passcode to one of your choosing. We recommend an easy number for your students to remember, like the 5-digit course code.
- Sign in to scu.zoom.us and navigate to Meetings.
- Click the topic of the meeting you would like to update the passcode for.

- Click Edit this Meeting.
- In the Security section, check the passcode box if it is unchecked.
- Edit the passcode.
- Click Save.
- Sign in to scu.zoom.us and navigate to Meetings.
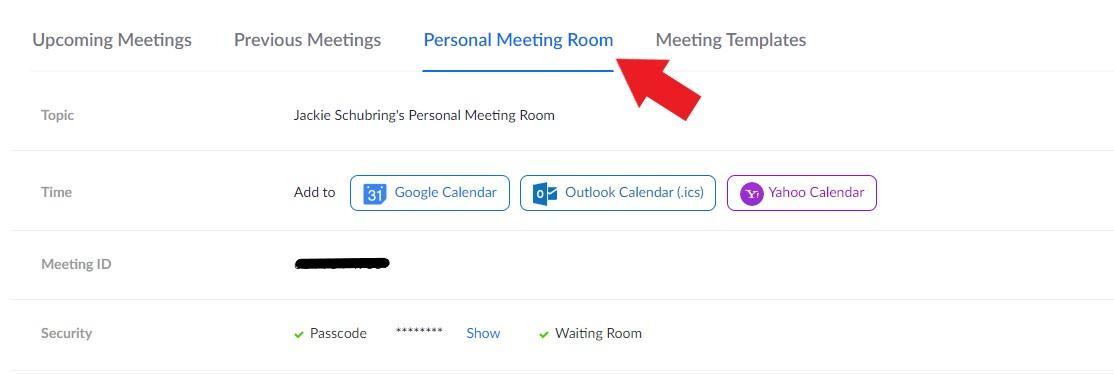
- Click Personal Meeting Room.

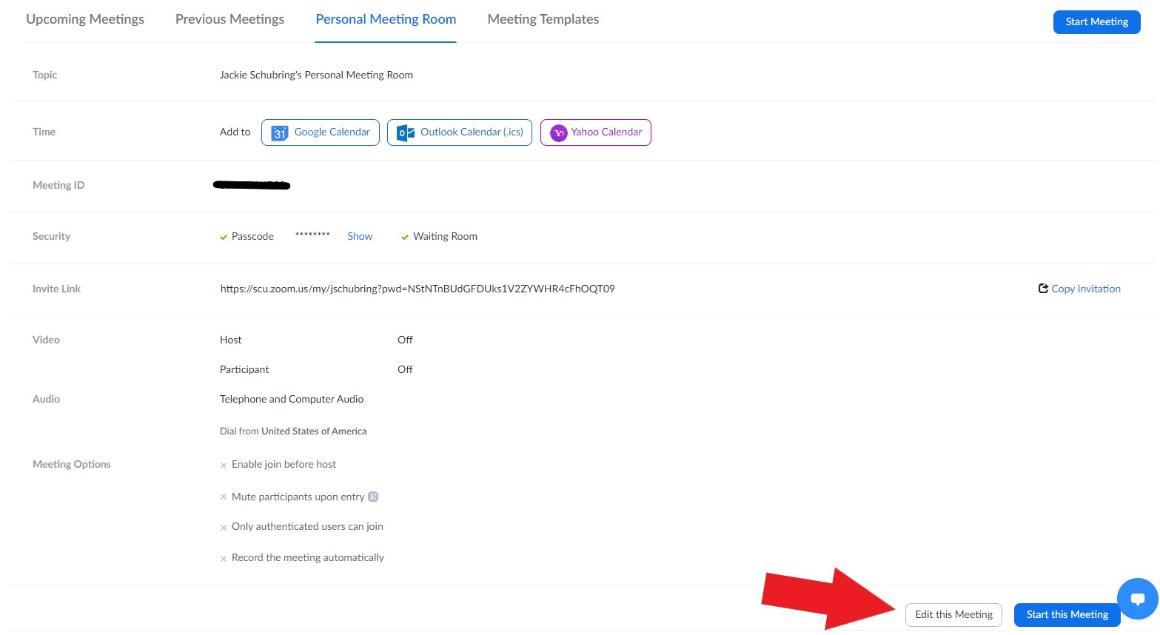
- Click Edit this Meeting.

- In the Security section, edit the passcode. You can also enable Waiting Room.
- Click Save.
If you disable “join before host”, the participants will see a pop-up dialog that says "The meeting is waiting for the host to join." If you are the host, there is a login button to login and start the meeting as the host.

- Sign in to scu.zoom.us and navigate to Meetings.
- Click the topic of the meeting you would like to enable or disable "Join Before Host".

- Click Edit this Meeting.
- Under Meeting Options, un-check “Enable join before host” to disable it. Alternatively, check this box to “Enable join before host”

- Click Save.
Authentication profiles allow hosts to restrict participants who can join a meeting to those who are logged into Zoom.
If a participant tries to join the meeting and is not logged into Zoom, or logging in with the specified email domain, they will receive one of the following messages:
- if they are not logged into Zoom:

- If they are logged in with the wrong email domain:

How to Enable Authentication Profiles on your account
- Sign into https://scu.zoom.us/ and navigate to Settings.
- Enable Only authenticated users can join meetings.
- If the setting is disabled, click the Status toggle to enable it. If a verification dialog displays, choose Turn On to verify the change

How to Enable Authentication Profiles on your meeting
- Log into scu.zoom.us.
- Navigate to Meetings.
- Schedule or Edit a meeting.
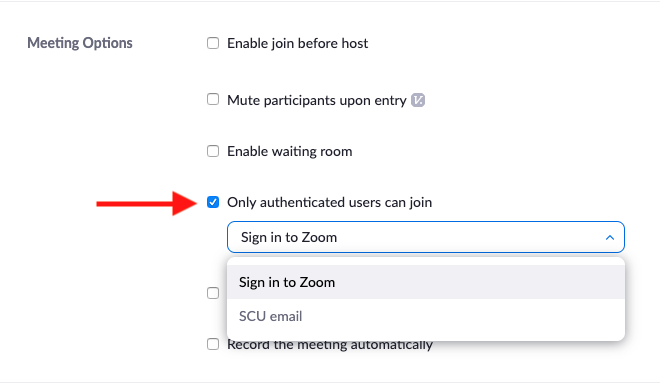
- Under "Meeting Options" check "Only authenticated users can join." You can limit it to everyone with Zoom accounts, or only those with an SCU email address.

- Finish scheduling the new meeting or save these changes for an existing meeting.
The alternative host option allows you to schedule meetings and designate another Licensed user on the same account to start the meeting or webinar if you are unable to. This user will receive an email notifying them that they've been added as an alternative host, with a link to start the meeting. The alternative host will need to use the link in the email or have the calendar invite sent to them by the original host and use the join link there. The meeting will not display in the upcoming meetings list in the desktop client or mobile app for alternative hosts.
If a host is attending a meeting but needs assistance with managing the meeting, they can assign a co-host only during the meeting.
- Sign in to scu.zoom.us and navigate to Meetings.
- Click the topic of the meeting you would like to add an "Alternate Host" to.

- Click Edit this Meeting.
- Next to Alternative Hosts, type the email of your alternative host. Note that the alternative host must have a licensed account with SCU.

- Click Save.
The co-host feature allows you to share hosting privileges with another user in a meeting or webinar. This can be useful to allow another user to manage the administrative side of the meeting, such as muting participants or starting/stopping the recording.
Co-hosts are assigned during a meeting and cannot start a meeting. If a host needs someone else to be able to start the meeting, they can assign an alternative host.
Using co-host in a meeting:
There are two ways that you can make a user a co-host.
- In the meeting, the host hovers over the user's video, clicks on the three dots and chooses Make Co-Host.

- Alternatively, the host can make another participant a co-host through the Participants window.
- Click on Manage Participants in the meeting controls at the bottom of the Zoom window.

- Hover over the name of the participant who is going to be a co-host, and choose More.
- Click Make Co-Host.

Once a participant has been made a Co-host, they'll have access to the co-host controls.

